
You have watched the DesignJoy story and want your own flat-fee design subscription. This is the list of what has to exist before a client pays you, in the order to build it, with what each piece costs.
Print it and tick each line as you go. Terms, tax and business registration need local advice, so they are not on this list.
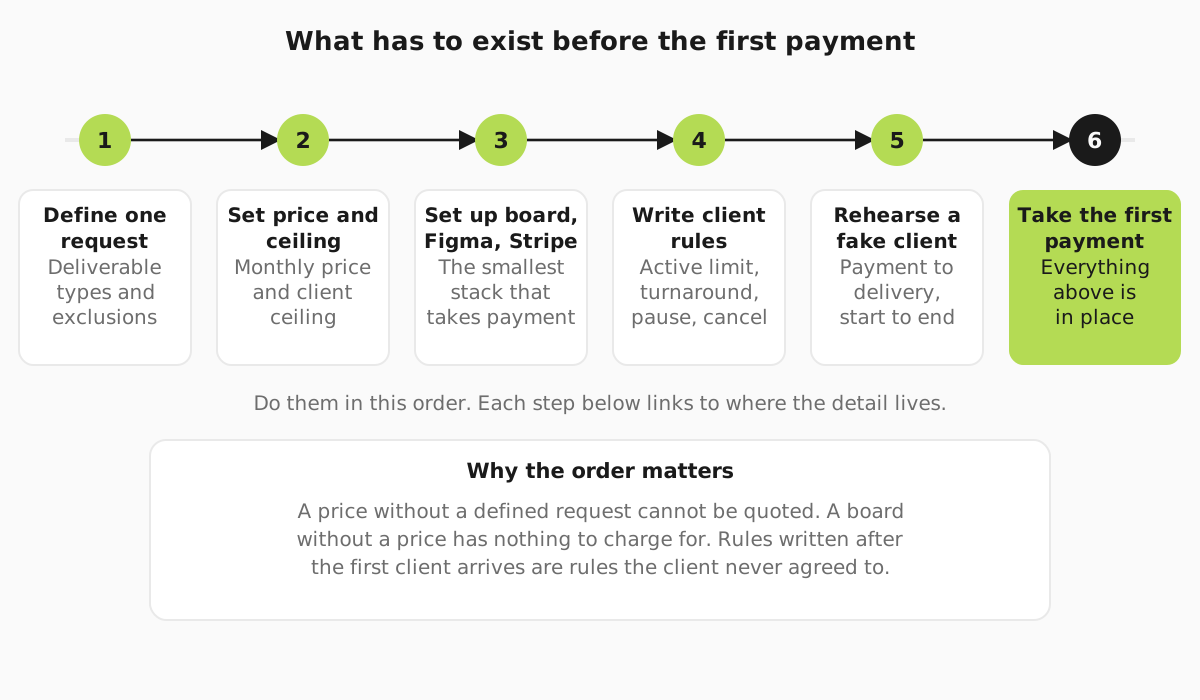
Decide exactly what one request is
A client sends five things on Monday. One goes into your active column and four wait in the order the client picks; when you deliver and they approve, the next starts. That only holds if one request is written down.
- Write down the work you will accept, who approves it and how many requests may be active.
- List three to five deliverable families you take, such as a social set or a landing page, and name what you do not take, such as video.
- Define one request in a sentence a client can check, for example "one deliverable family, for one brand, in one set of sizes".
The one active request rule guide shows how to word the limit. The service design and pricing guide turns a broad offer into boundaries a client can hold you to.
Set your price and your ceiling
The offer you have probably seen is DesignJoy's Monthly Club: $4,995 a month, shown as discounted from $5,995 (designjoy.co). It gives one request at a time, an average 48-hour delivery, up to 2 users, and lets you pause or cancel anytime. Treat it as the number prospects carry in their heads, not a price to copy. At the low end, Penji Essentials is $995 a month (Penji pricing). ManyPixels Advanced is $699 a month billed monthly (ManyPixels pricing). The rest of the market is in what design subscriptions charge.
Your ceiling matters as much as your price. The illustrative solo week in our capacity and profitability guide comes down to about 22 production hours once sales and invoicing come out. The same guide uses an illustrative 4-hour average request, so that week holds 5.5 delivered requests. That is about five clients if each gets one delivery a week, or two clients if each gets two. Replace both figures with your own once you have a month of history.
- Pick one monthly price and write down exactly what it includes.
- Fill in the pricing and capacity worksheet with your own hours. Write your client ceiling at the top, and decide whether reaching it means a waitlist or a price rise.
Set up the smallest stack that works
On day one you need a queue, a design tool and a monthly payment. Everything else can wait for a real client.
| Job | Tool and plan | Monthly cost |
|---|---|---|
| Request queue, one board per client | Trello Free | $0, up to 10 collaborators per Workspace |
| Design and client comments | Figma Professional, 1 full seat | $16 |
| Monthly subscription payments | Stripe Billing, pay as you go | 0.7% of billing volume, plus card fees |
| Walkthrough videos on delivery | Loom Starter | $0 |
| Automation, for example new payment to new board | Make Free or Zapier Free | $0 |
| Total | $16 a month plus Stripe percentages |
Card fees depend on your country. In the UK, Stripe charges 1.5% + 20p (about $0.27) per standard domestic card (Stripe UK pricing). We could not confirm the US rate: every US address redirected to a European page. Read Stripe's pricing page for your own country before you set your price. Slack is optional on day one. The Free plan keeps 90 days of messages; Pro is €8.25 (about $9.40) per user a month billed monthly (Slack pricing). Google Drive and Webflow are common additions too, but we could not load their pricing pages. Check current prices on their own sites before you add them to the total. A branded client login can wait: client portals covers when one starts to pay for itself.
- Create one Trello board per client with four columns: queue, active, with client, done.
- Create a Stripe product at your monthly price with a payment link that starts the subscription.
If you are torn between boards, Trello vs Notion vs ClickUp for a design request queue compares the three on the queue job alone. The software section has every category with costs.
Write the rules clients will read before they pay
Put these beside the payment link. A rule first read after paying feels like a catch.
- State the active limit: one request in progress per subscription, the rest queued in the client's order.
- Word turnaround as an average for a typical request, and say when the clock starts.
- Say how pause and cancel work, including what happens to a request that is half done.
- Decide whether you offer a refund window, and write the number of days if you do.
The awkward case is a client who pauses in the middle of a request. The pause or cancel mid-request guide gives you the wording before it happens.
Rehearse one fake client from payment to first delivery
Pay through your own Stripe link and invite a friend to play the client. If you cannot tell when that request is ready to start, a portal will only give an unclear process a new address.
- Take a test payment and check that the welcome email and the board invite go out the same day.
- Have your friend submit one request on the design request brief, and note anything you had to ask before you could start.
- Deliver it with a Loom walkthrough, take one round of feedback, then pause and cancel the test subscription.
The onboarding workflow guide sets out what should happen between payment and the first card going active.
Take the first real payment
Send your payment link only when every line above is done. The first real client should get exactly the flow you rehearsed.
- Send the payment link with your client rules on the same page, not in a later email.
- Start the first request only when its brief is complete, and tell the client the day it goes active.
Already selling and delivery is chaos?
If you already have clients and two of them keep asking what is in progress, start with the request queue guide, not with new software. Once the queue has an owner and a daily review, the software pages show which tool fixes which problem and what it costs.